Kids4God.org | home
Why your church should have a Children's Church | Support Us | Links for Children's Ministers | Plans For a Traveling Puppet Stage | Puppet Scripts and Service Orders
Plans For a Traveling Puppet Stage
This page is under construction.
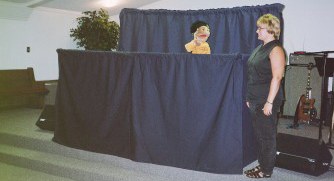
I built this stage for traveling. It is large when set up and compact when taken down. It is light weight, but that makes it less durable. Puppeteers should be cautioned not to lean on this stage. Children should be kept away so that they do not attempt to climb it. You can build this stage for less than $100 US. If you would like me to build it for you I can. The frame would be $100 plus shipping. The entire stage would be $200 plus shipping. Stages and frames will come with an assembly video. All funds would be to support Kids4God.org. This can be custom made to suit your purposes.
This stage is 8' wide x 4' deep. It is 4' tall on the front and sides. It is 6' to 7' tall in back. The PVC pipe can be easily cut to shortened where preferred.
Parts Needed
I used 1" PVC pipe. It would have been sturdier with 1 1/4", but would have been more expensive and harder to travel with.
You will need 10 8' sections of 1" diameter pipe.
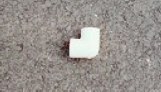
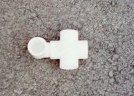 "Street Elbow" (8)
"Cross" (2)
These have been glued together.
|
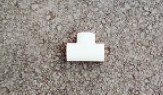 "Tee"
(7)
|
 "Female Joint"
(4)
|
 "Female Elbow"
(2)
|
NOTE: If stage does not have to travel in a small vehicle, do not cut PVC pipe for front and rear 8' frame bars (lower, middle, or top). This will add strength.
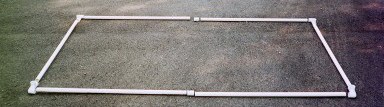 Lower level. Cut 3 of the 8' lengths into 4 foot lengths. The corners use a "street elbow" and a "Tee." The back bar uses a "Female joint" and the front uses a "Tee" (I know the photo shows a "joint" in front. It's wrong!). The front and rear bars go into the street elbows which then slide into the tees. The side bars go into the tees. The odd leg of the tee should point straight up.
Note: Once the stage has been built and tested... the street elbows can be glued to their corresponding tee or cross for greater strength. Do this one at a time so they aren't glued in the wrong direction!
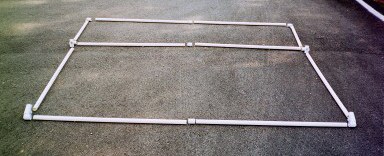 Middle section and upper bar. Cut 4 of the 8' lengths into 4 foot lengths. Cut 2 2 foot sections out of an 8' length. The front corners use a "street elbow" and a "Tee." The rear corners use a "cross" and a "Tee." The upper bar uses 2 elbows. Street tees fit into the bars, tees, and crosses the same as the lower section. The front, rear, and upper bars use a female joint.
 Note: Once the stage has been built and tested... the street elbows can be glued to their corresponding tee or cross for greater strength. Do this one at a time so they aren't glued in the wrong direction!
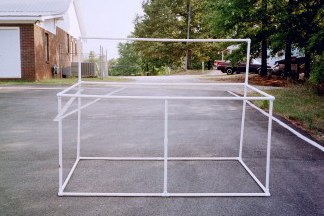 Final assembly. Cut 2 of the 8' lengths into 4 foot lengths. These will be the legs. This made the stage a little tall for my puppeteers, so I trimmed these lengths to 3'8". Use the remaining 4' of PVC pipe for a center support on the front bars. The bottom slides into the center tee. The top you will have to trim with a knife into a U shape to match the upper/center bar or joint. Cut the length to fit AFTER you cut the U to fit!
 I'm not very handy with a sewing machine, so I have someone make the curtains for me. Mom does a great job! Some things to remember about the curtains. Be sure to buy a fabric that light can not pass through. You can usually search in a few fabric stores and find something on special. We sew a loop into the entire top portion, remember to sew hemmed hole for the cross sections. You can sew loops into the bottom as well, or sew on Velcro attachments for easier dismantling.
Here's a great e-mail I received from Steve. It's some advice about his puppet stage.
I'm was already in the process of building a second stage for our church when a friend gave me material on your web site and the plans. Our first stage was built with 2" PVC and is very heavy; after studying the material at the local Lowe's, I had decided on the 1 1/4" stock. One mistake that the person(s) building the 1st stage was that they used DWV (drain-waste-vent) fittings instead of the regular water line fittings: DWV only has a thick wall/shoulder for the first 1" or so, then it thins down. As a result several fittings have cracked in that shoulder area and need replacement. That's a point you could mention in your written description.
Let me also share with you an internet plumbing supply house where I found "Side Outlet 90" fittings for the corners - it's a complete ready-to-go fitting in itself as opposed to the glued-up assembly you had to use.
http://www.plumbingstore.com/pvc.html There's handling and shipping charges, but it might be simpler that having to glue pieces together. And, you need 8 ea. per stage as you describe. Their costs for the other fittings are very reasonable as well; I just bought all I needed from them, except for the 10" pipe sticks and cement. When assembling with the cement, simply apply to both the pipe end and inside the fitting, then push the two together and rotate the pipe 1/4 turn and hold for about 10 seconds, and you're done. Because there's no "upper" outlet on the back upper corners using these fittings, I'm just gluing a "tee" right next to it. It results in a loss of 2" or so of backdrop area on each side.
Since we "set up and take down" our stage the front and back walls sections are cemented together solid, but the 4 ea. side pipes joining the front and back together are kept loose. We drilled holes down through the assembled joints (pipe and fitting exterior) then dropped in long bolts (nails with the pointed ends ground off will work too) to hold the assembly together until time for disassembly. Gravity holds them in place.
Continue in your ministry; it has great rewards!
 |
28" Puppets only
$38 + $5 shipping!
Click on the
puppets to visit
PuppetTeam.com!
|
 |

Copyright 2000 by Gene Powell